그동안 최신 React나 Vue 문법으로 페이지를 구축할 때는 this 키워드를 사용할 일이 많지 않았는데, 오래전에 구축된 웹사이트를 유지보수하면서 this를 자주 사용하게 되었습니다. 다만 특정 상황에서 this가 예상과 다르게 동작해 어려움을 겪었고, 이를 계기로 this를 제대로 정리할 필요가 있다고 생각했습니다.
this 키워드의 동작 방식을 정리합니다.
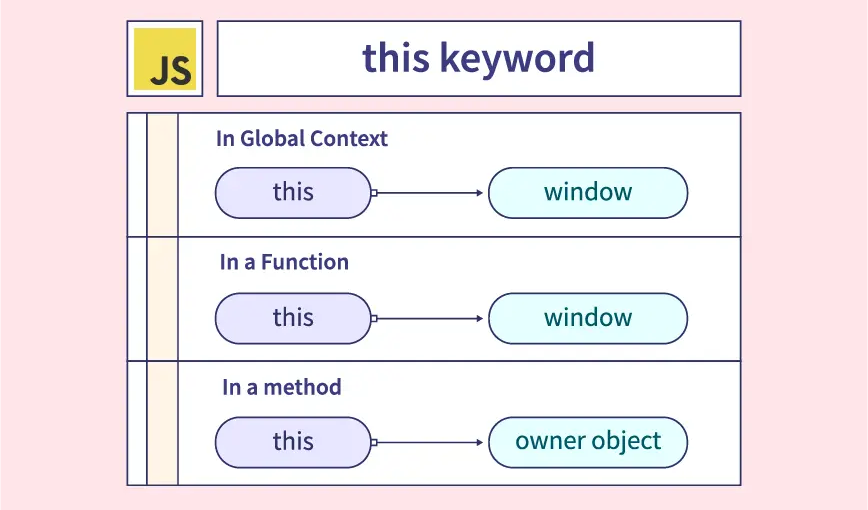
JavaScript에서 this 키워드란?
this는 생성자 혹은 메소드(멤버 함수)에서 객체를 가리킬 때 사용하는 키워드입니다. 새로 생성된 객체에 생성자의 속성을 넣거나 객체의 속성에 접근할 때 주로 사용합니다. JavaScript의 this는 Java와 달리 함수 호출 방식에 따라 바인딩되는 객체가 달라집니다.
함수 호출 방식
JavaScript의 함수 호출 방식은 함수 호출, 메소드 호출, 생성자 호출, apply/call/bind를 통한 호출 4가지로 분류됩니다.
const showThis = function () {
  console.log(this);
};

// 1. 함수 호출
showThis(); // window

// 2. 메소드 호출
const obj = {
  name: "test-obj",
  func: showThis,
};
obj.func(); // { "name": "test-obj", fuuc: f }

// 3. 생성자 함수 호출
const instance = new showThis(); // instance

// 4. apply, call, bind 호출
const bar = { name: "bar" };
showThis.apply(bar); // { "name": "bar" }
showThis.call(bar); // { "name": "bar" }
showThis.bind(bar)(); // { "name": "bar" }1. 함수 호출
기본적인 함수 호출 방식을 말하며, 이때 this는 전역 객체(Global Object)에 바인딩됩니다. 전역 객체는 최상위 객체를 의미하며, 일반적으로 브라우저 환경에서는 window, 서버 환경(Node.js)에서는 global을 뜻합니다.
1) 전역 함수의 this는 전역 객체를 가리킵니다.
// 전역 함수를 선언
function showThis() {
  console.log(this);
}

this.showThis(); // window2) 전역 함수뿐만 아니라 내부 함수의 this는 전역 객체를 가리킵니다.
// 전역 함수 뿐만 아니라 내부 함수도 this는 window 객체를 가리킵니다.
function showOuter() {
  console.log("outer's this: ", this); // window
  function showInner() {
    console.log("inner's this: ", this); // window
  }
  showInner();
}
showOuter();3) 메소드의 내부 함수의 this는 전역 객체를 가리킵니다.
// 바깥에서 var로 선언한 변수는 window 객체에 바인딩됨
var value = 1;

const obj = {
  value: 50,
  showOuter: function () {
    console.log("show's this: ", this); // obj
    console.log("show's this.value: ", this.value); // 50

    function showInner() {
      console.log("showInner's this: ", this); // window
      console.log("showInner's this.value: ", this.value); // 1
    }
    showInner();
  },
};

obj.showOuter();4) 일반적인 콜백 함수의 경우 this는 전역 객체를 가리킵니다.
var value = 1;

const obj = {
  value: 50,
  show: function () {
    setTimeout(function () {
      console.log("callback's this: ", this); // window
      console.log("callback's this.value: ", this.value); // 1
    }, 500);
  },
};

obj.show();5) 이벤트 핸들러의 this는 이벤트를 받는 HTML 요소를 가리킵니다.
<button id="btn">click</button>;

const btn = document.getElementById("btn");

btn.addEventListener("click", function () {
  console.log(this); // btn
});※ this가 전역 객체를 참조하는 것을 회피하는 방법
ES6에 추가된 화살표 함수를 사용하거나, 메소드의 this가 객체를 가리키는 점을 이용해 this를 다른 변수에 할당한 뒤 참조하면 됩니다.
// 바깥에서 var로 선언한 변수는 window 객체에 바인딩됨
var value = 1;

const obj = {
  value: 50,
  showOuter: function () {
    const innerThis = this; // 멤버 함수가 가리키는 this(obj)를 innerThis변수에 할당

    function showInner1() {
      console.log("showInner1's this: ", this); // window
      console.log("showInner1's this.value: ", this.value); // 1
    }

    // innerThis가 가리키는 변수(obj)를 참조한다.
    function showInner2() {
      console.log("showInner2's this: ", innerThis); // obj
      console.log("showInner2's this.value: ", innerThis.value); // 50
    }

    // 화살표 함수의 경우 상위 스코프의 this(이 경우에는 obj)를 가리킵니다.
    const showInner3 = () => {
      console.log("showInner3's this: ", this); // obj
      console.log("showInner3's this.value: ", this.value); // 50
    };

    showInner1();
    showInner2();
    showInner3();
  },
};

obj.showOuter();이외에도 후술할 apply, call, bind 메소드를 사용하면 this를 명시적으로 바인딩할 수 있습니다.
2. 메소드 호출
메소드(method)는 객체의 멤버 함수를 의미합니다. 메소드가 호출될 때 메소드 내부의 this는 해당 메소드를 호출한 객체에 바인딩됩니다.
1) 메소드 내부의 this는 메소드를 호출한 객체를 가리킵니다.
const obj1 = {
  name: "Kim",
  showName: function () {
    console.log(this.name);
  },
};

const obj2 = {
  name: "Park",
};

obj2.showName = obj1.showName;

obj1.showName(); // Kim
obj2.showName(); // Park2) 프로토타입 객체 메소드 내부의 this도 해당 메소드를 호출한 객체를 가리킵니다.
function Person(name) {
  this.name = name;
  console.log(this);
}

Person.prototype.getName = function () {
  return this.name;
};

const me = new Person("Kim");
console.log(me.getName()); // Kim

Person.prototype.name = "Park";
console.log(Person.prototype.getName()); // Park3. 생성자 함수 호출
생성자 함수의 경우 this 또한 호출한 객체를 가리킵니다. 다만 기존 함수와는 다르게 바인딩 방식이 조금 더 복잡합니다. 아래 코드는 Person 함수를 생성자 함수로 호출하는 예제이며, 해당 코드를 기준으로 생성자 함수를 정리합니다.
※ 생성자 함수란?
생성자 함수는 객체를 생성하는 역할을 하는 함수입니다. 다른 객체 지향 언어와 달리 JavaScript의 생성자 함수는 따로 형식이 정해져 있지 않으며, 기존 함수에
new연산자를 붙여 호출하면 해당 함수가 생성자 함수로 동작합니다.따라서 생성자 함수는 일반적으로 첫 문자를 대문자로 작성하여 일반 함수와 구분합니다.
function Person(nm) {
  this.name = nm;
  console.log(this);
  // 암묵적으로 this에 바인딩 된 객체를 반환한다.
}

// 생성자 함수이므로 {name : 'Kim'} 객체가 반환됨
const person1 = new Person("Kim"); // { name: 'Kim' }
console.log(person1); // { name: 'Kim' }

// 생성자 함수가 아니므로 아무 값도 반환되지 않음.
const person2 = Person("Park"); // window
console.log(person2); // undefinedPerson 생성자 함수의 동작은 다음과 같습니다.
- Person 함수가
new키워드로 호출되어 생성자 함수로 동작을 시작하면, 먼저 빈 객체가 생성되고 이 객체가this에 바인딩됩니다. - 파라미터로 받은
nm을 빈 객체의name변수로 할당합니다. - 생성자 종료 시점에서 이 객체를 암묵적으로 반환하며, 이후 메소드에서 호출하는
this는 이 객체를 가리킵니다.
이러한 과정 때문에 생성자 함수에서는 명시적으로 반환문을 사용하지 않는 것이 좋고, this 이외의 다른 값을 반환하면 생성자 함수의 의도와 다르게 동작할 수 있습니다.
4. apply, call, bind 호출
맨 처음 함수 호출 방식에 따라 this에 바인딩되는 객체가 달라진다고 언급했는데, 이러한 암묵적인 규칙 외에도 this를 특정 객체에 명시적으로 바인딩하는 방법이 있습니다.
모든 함수 객체의 프로토타입 객체인 Function.prototype 객체의 메소드인 apply, call, bind 함수를 사용하는 방법입니다.
// func : 호출될 함수를 나타내는 함수 객체
// thisArg : this 값으로 설정할 객체

// Function.prototype.apply
// [...args] : : 함수에 전달할 파라미터들로 구성된 배열 또는 유사 배열 객체
func.apply(thisArg, [...args]);

// Function.prototype.call
// args1, args2, arg3, ... : 함수에 전달할 파라미터들
func.call(thisArg, args1, args2, arg3, ...);

// Function.prototype.bind
// args1, args2, arg3, ... : 함수에 전달할 파라미터들
func.bind(thisArg, args1, args2, arg3, ...); // 즉시 호출되지 않음apply와 call은 첫 번째 인자를 제외한 나머지 인자를 배열로 받는지 여부 정도만 차이가 있을 뿐, 동작은 유사합니다. bind는 call과 인자 형태가 동일하지만, 함수를 즉시 실행하지 않고 바인딩된 새 함수를 반환한다는 차이가 있습니다.
1) apply, call 예제
아래는 생성자 함수로 Person 객체를 각각 생성한 후 person1.showName 내부의 this를 apply, call을 이용해 각각 person2, person3 객체에 바인딩하는 예제입니다.
function Person(name, age) {
  this.name = name;
  this.age = age;
  this.showName = function () {
    console.log(`My name is ${this.name}, and I am ${this.age} years old.`);
  };
}

const person1 = new Person("Kim", 20);
const person2 = new Person("Park", 30);
const person3 = new Person("Choi", 25);

person1.showName(); // My name is Kim, and I am 20 years old.
person1.showName.apply(person2); // My name is Park, and I am 30 years old.
person1.showName.call(person3); // My name is Choi, and I am 25 years old.
person1.showName(); // My name is Kim, and I am 20 years old.콘솔을 확인해보면 person1.showName 내부의 this가 영구적으로 바인딩된 것이 아니라, apply/call을 호출한 시점에만 person2, person3로 바인딩된 것을 확인할 수 있습니다.
2) bind 예제
만약 this를 바인딩한 뒤 즉시 호출하는 것이 아니라 나중에 사용해야 한다면 bind를 사용하시면 됩니다. 아래는 bind로 person1.showName 내부의 this를 person2 객체로 바인딩하는 예제입니다.
function Person(name, age) {
  this.name = name;
  this.age = age;
  this.showName = function () {
    console.log(`My name is ${this.name}, and I am ${this.age} years old.`);
  };
}

const person1 = new Person("Kim", 20);
const person2 = new Person("Park", 30);
const bindFunc = person1.showName.bind(person2);

person1.showName(); // My name is Kim, and I am 20 years old.
bindFunc(); // My name is Park, and I am 30 years old.이처럼 bind는 바인딩과 실행 시점을 분리할 수 있습니다.
참고자료
Related Posts

화살표 함수의 특징과 일반 함수와의 차이점
화살표 함수(Arrow Function)의 문법과 this/arguments/constructor/prototype/yield 등 일반 함수와의 핵심 차이점을 예제와 함께 정리합니다.

Vanilla JS 댓글 모듈 자체 개발기
프레임워크 독립적인 Vanilla JS 댓글 모듈을 설계·개발하고 기존에 서비스 중이던 Nuxt 3 프로젝트에 통합한 과정을 다룹니다.

VS Code에서 Pylint import error(E0401) 해결하기
VS Code에서 모듈이 설치되어 있는데도 `Unable to import` 오류가 발생할 때, Python Interpreter 설정을 점검하여 해결한 과정을 정리합니다.